
Exploring Underground Herodium
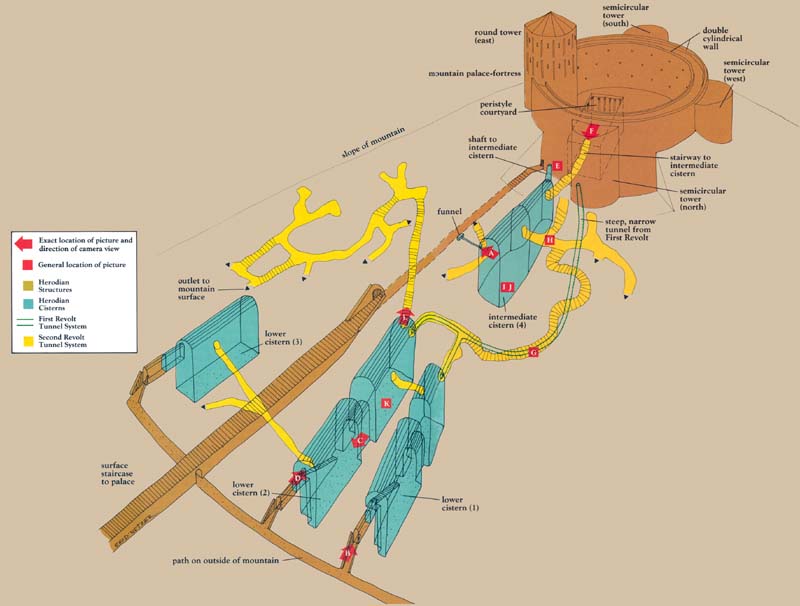
Let’s take a walk through the labyrinth of tunnels and stairways and cavernous cisterns hidden below the palace-fortress at Herodium. You can do this by following the reconstruction drawing above, the plan below and the pictures following.
The colors on the drawing will also help you. The mountain palace-fortress, the steep outer stairway and the path to the cistern openings were all built by Herod in about 23 B.C.; they are colored brown. Herod also built the underground cisterns at about the same time; they are colored blue.
The steep, narrow tunnel, colored green, is a tunnel dug by the Jewish defenders of Herodium during the First Jewish Revolt against Rome (66–70 A.D.). It gave them access to the water in the lower cisterns from inside the palace. It was functional but certainly inconvenient.
The stairways and tunnels, colored yellow, are the network built by the Jewish rebels, during the Second Jewish Revolt against Rome (132–435 A.D.), as an underground hideaway and defensive system. At that time Herod’s cisterns (which continued to be used for water storage during the First Revolt) were used as passageways as well as to hold earth accumulated when the tunnels were carved.
Let’s start on our walk. We will stop occasionally at several points where pictures will show you where we are. To help locate the photographs on the reconstruction drawing, we have identified the photographs by letters, which appear in the appropriate place on the drawing. In instances where the direction and location of a view are known, the letters are enclosed in arrows pointing in the camera direction; when only a general location is known, the letters are enclosed in squares.
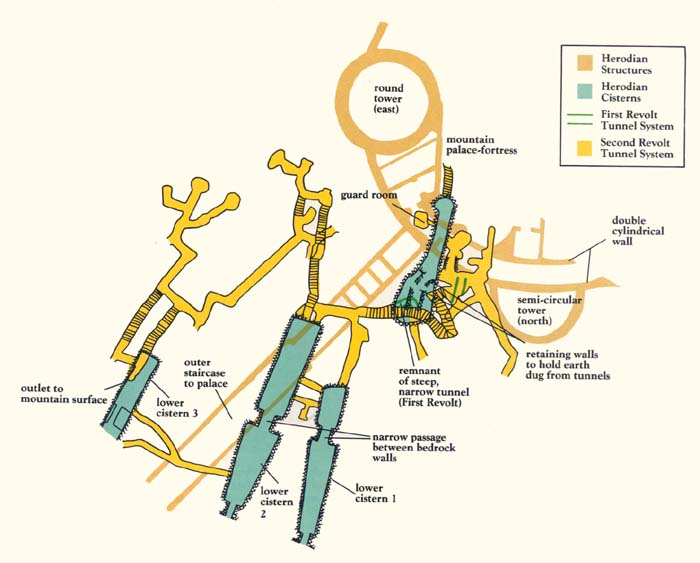
We will begin where Herod himself would have started, by walking up the steep, outer staircase leading to the mountain palace, in the lower left of the reconstruction drawing. Note that about halfway up, the stairway goes underground through a corridor and emerges again only near the top. Close to the top of the 500-foot-long staircase, on our right, is an opening in the wall of the corridor (picture A). This is the opening to the channel we call the “funnel.” During Herod’s time, this channel carried water into the intermediate cistern (4). Water was brought to the funnel in skins, jars and buckets, filled from water stored in one of Herod’s three lower cisterns (1, 2 and 3). Today these cisterns have been partially cleaned and emptied of accumulated debris.

Before continuing on our way up the mountain, take a side trip from the stairway, along the path on the outside of the mountain, to the entryway to cistern 1 (picture B). Herod’s water carriers walked through this passage. When rainwater was insufficient to fill the cistern they carried water on muleback to this cistern from the huge pool in Lower Herodium. Water reached the pool through an aqueduct from perennial springs west of Herodium near Bethlehem. Other water carriers dipped out the cistern’s water to carry it up to the funnel connected to the intermediate cistern (4). Water from the intermediate cistern was accessible from inside the mountain palace-fortress.
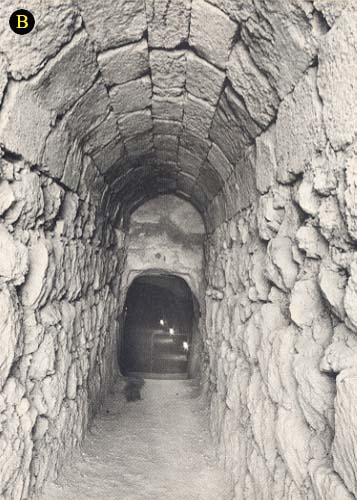
Herod dug these cisterns before the massive earth and gravel fill was piled up against the cylinder wall of the palace-fortress to create the volcano-shaped mountain. The vaulted corridor seen in the picture prevented fill from penetrating into the cistern.
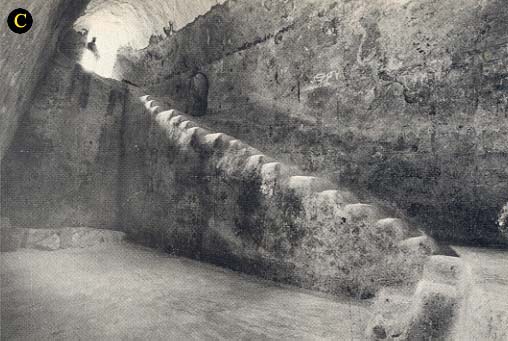
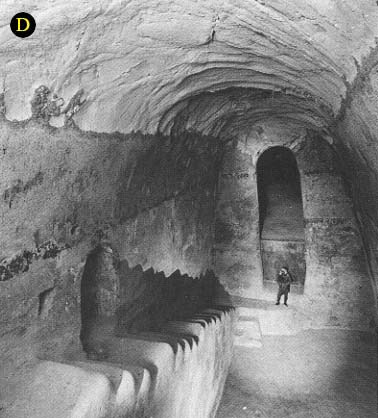
Returning to the outer path we now visit cistern 2, the largest of all the cisterns. Rock-cut stairs descend to the bottom of the 32-foot-high underground cavern (pictures C and D). In picture D, a man stands before bedrock walls that protrude into the cistern, leaving a narrow passage connecting this half of the cistern with its other half beyond the arched opening. Together, the two parts of the cistern are almost 100 feet long. In the same photograph, on the left toward the top of the stairway, is a small opening, marking the end of a tunnel. This tunnel was cut by the Jewish defenders during the Second Revolt against Rome, about 150 years after Herod dug the massive cistern. The passage connects cistern 2 with cistern 3 and may have branched off to an outlet on the surface of the hill.
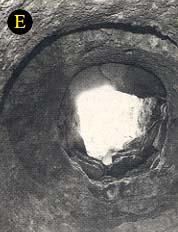
Let’s resume our climb up the steep outer stairway to its upper end in the elegant palace courtyard. In this hot, dry, desert location Herod accumulated water from the infrequent rains in pools and cisterns. He also diverted spring water to the large pool in Lower Herodium, through the aqueduct mentioned above. Some of this water was transported by donkeys to the lower cisterns deep within the mountain, as we have seen. Some of this water was also poured into the funnel on the outer stairway so as to flow into the intermediate cistern. Herod also cut a vertical shaft from the courtyard down to the intermediate cistern. In this way, Herod had what was in effect a well. A bucket on a rope could be lowered from within the safe confines of the palace down into the cistern. We see the shaft interior in picture E.
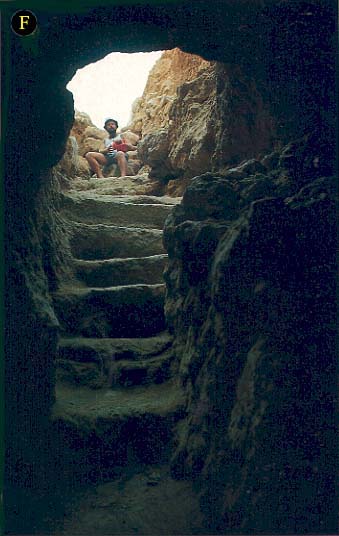
Now let’s descend into the heart of the mountain. Our route is via the stairway from the palace courtyard (picture F). Built about 135 A.D. by the rebels led by Bar-Kokhba, these well-carved steps gave access to the entire underground network of tunnels, stepped-passages and storerooms used during the Second Revolt. The spacious Second Revolt stepped-tunnel “swallowed” most of the steep, narrow tunnel constructed during the First Revolt about 70 years earlier to connect the intermediate cistern with lower cisterns (1 and 2). Only vestiges of the earlier tunnel remain for us to see.
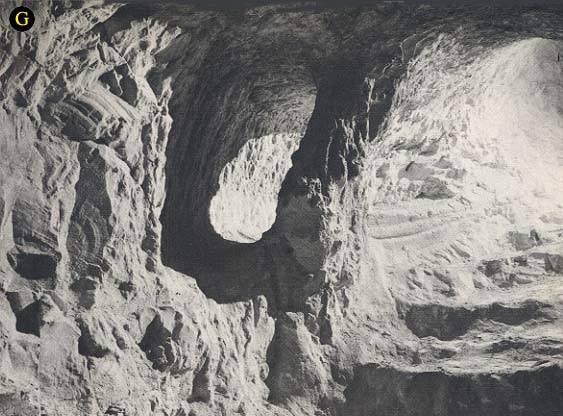
Picture G shows a portion of the main Second Revolt tunnel connecting the intermediate to the lower cisterns; left of center, outlined by shadow against the rock wall, is a short remaining section of the earlier narrower, winding tunnel.
When the Second Revolt defenders dug their tunnels, they tried to avoid digging through the fill that had been heaped by Herod against the circular wall surrounding the palace to form his artificial mountain. Sometimes the fill could not be avoided and in such places, to prevent collapse, wooden beams were used to reinforce the ceilings of the tunnels. After more than 1,800 years most of the wood deteriorated and disappeared, but in the dry Judean desert, some was preserved, such as that shown in picture H in the roof of a side tunnel near the intermediate cistern.

The cisterns are, of course, dry now, just as they were during the Second Revolt, so we can easily explore them. Mysterious walls within the cisterns seem to form small rooms, but in fact they were constructed to hold earth fill excavated from the tunnels the rebels of the Second Jewish Revolt were digging. Fearing detection if they dumped earth outside the mountain, the rebels piled fill, dug from the tunnels, on the floor of cisterns and behind quickly built walls in the cisterns. The cisterns were spacious enough to hold the unneeded earth and still to provide passage and usable space. Presumably, cisterns elsewhere on the mountain continued to be used for water storage.
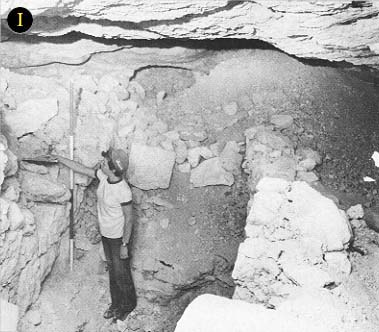
In picture I we see a deteriorated wall found within intermediate cistern 4.
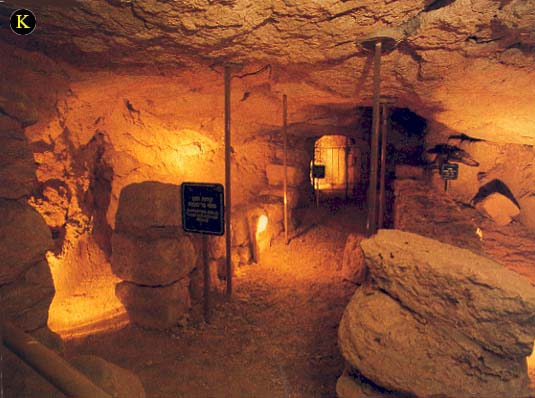
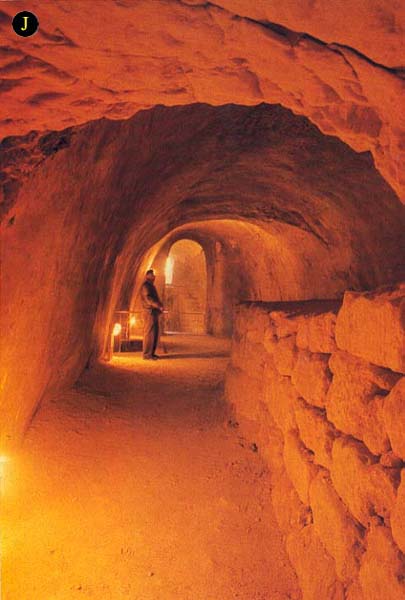
Now prepared for visitors, the walls of the intermediate cistern are seen restored in picture K. A well-constructed wall found in cistern 2 is shown in picture J.
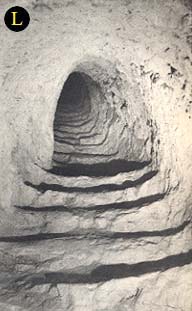
As we investigate cistern 2, we must not neglect its southern end, the end opposite the vaulted entryway. There we find the beginning of the long, straight stairway. Rising 42 feet (see picture L) in a southerly direction it then turns east for 13 feet and continues its ascent for 10 more feet toward the north. The passage then divides into a network of tunnels, south of, and above, cistern 3. At the end of one of these tunnels an outlet to the surface of the mountain was discovered. The author suspects that further investigation of some of the tunnels that have been described as “false starts,” or blind tunnels, will yield other such openings. What purpose did these openings serve? Excavator Ehud Netzer thinks he knows. When a Roman assault came, the defenders hidden within the mountain could move quickly through the tunnel system to a well positioned opening on the mountainside to surprise the attackers.
Whether this defensive system was ever used by the rebels, we do not know. But ultimately the Romans crushed the revolt and Jews were, for the most part, banished from Judea.